
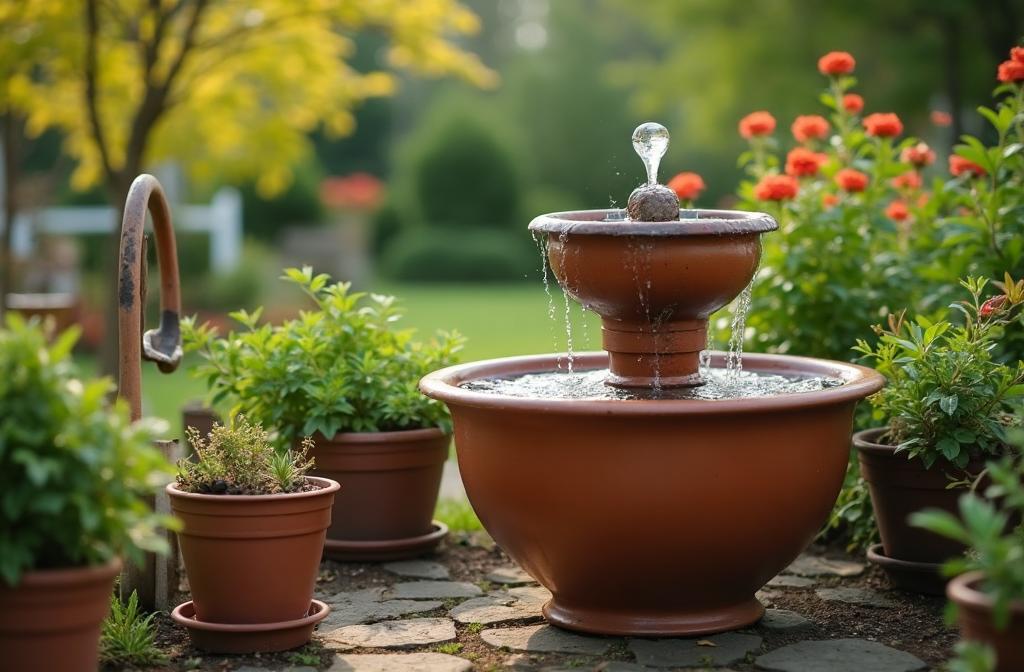
How to Make a Fountain: DIY Instructions for Your Garden
Step-by-step guide to building a simple container fountain for your garden, plus advice on when to upgrade to professional installation.
Adding a fountain to your garden brings the soothing sound of water to your outdoor space. Here's how to create a simple container fountain, plus guidance on when larger projects need professional help.
Simple Container Fountain Project
This beginner-friendly project creates a charming bubbling fountain from a decorative container.
Materials Needed: - Waterproof container (ceramic pot, urn, or basin) - Submersible pump (100-200 GPH for small fountains) - Flexible tubing to fit pump outlet - River rocks or decorative stones - GFCI outdoor electrical outlet access - Optional: fountain head attachment
Step 1: Choose Your Container
- Select a waterproof container at least 12 inches wide and deep. Options include:
- Glazed ceramic pots (check for drainage holes to seal)
- Concrete urns
- Cast stone basins
- Galvanized tubs for rustic look
If your container has drainage holes, seal them with waterproof silicone and let cure 24 hours.
Step 2: Position Your Container
- Place your container:
- On a level, stable surface
- Within reach of GFCI electrical outlet
- Visible and audible from seating areas
- Away from heavy leaf drop zones
Consider a sturdy base—a filled container is extremely heavy.
Step 3: Install the Pump
- Place the pump at the container bottom
- Attach tubing to the pump outlet
- Run tubing up through center (you'll hide it later)
- Route electrical cord over the container edge
Step 4: Add Rocks and Water
- Place large rocks around the pump to hide it
- Layer medium stones, leaving space for water circulation
- Position tubing to emerge at desired height
- Add smaller decorative stones on top
- Fill with water, covering pump completely
Step 5: Test and Adjust
- Plug into GFCI outlet
- Adjust water flow using pump dial (if available)
- Reposition tubing for desired effect
- Add or remove water to achieve right level
- Listen for pump noise—rocks may need repositioning
Maintenance Tips
- Weekly: Check water level, add as needed - Monthly: Remove debris, clean pump intake - Seasonally: Deep clean pump and container - Winter: Bring pump indoors in Kansas City; containers may need protection
When DIY Isn't Enough
Consider professional installation for:
Size and Complexity - Fountains larger than 36 inches - Multi-tier designs - In-ground installations - Integration with existing landscapes
Electrical Requirements - Needs dedicated circuit installation - Underground wiring required - No GFCI outlet nearby - Lighting integration desired
Water Management - Permanent plumbing connections - Auto-fill systems - Integration with irrigation - Large water volume needs
Structural Considerations - Heavy stone requiring equipment - Foundation work needed - Retaining wall integration - Hillside installations
Professional Quality Differences
What separates professional fountainscapes from DIY:
1. Engineering: Proper pump sizing, water volume calculations 2. Materials: Commercial-grade pumps, professional fittings 3. Electrical: Code-compliant wiring, proper GFCI protection 4. Aesthetics: Natural stone selection, artistic composition 5. Longevity: Built to last decades, not seasons
Common DIY Mistakes
- Pump Too Small: Creates weak, unimpressive flow - Pump Too Large: Splashes water out of container - Ignoring Evaporation: Pumps burn out running dry - Poor Location: Too far from power, too close to trees - Skipping GFCI: Dangerous electrical safety violation
Project Cost Comparison
| Project Type | DIY Cost | Professional Cost | |--------------|----------|-------------------| | Container fountain | $50-150 | $300-800 | | Small bubbling rock | $200-400 | $1,500-3,000 | | Pondless waterfall | $500-1,000 | $3,000-10,000+ | | Formal fountain | Not recommended DIY | $5,000-25,000+ |
Our Recommendation
Start small with a container fountain to learn about water features. Once you experience the joy of flowing water, you'll likely want to upgrade—that's when Freedom Pondscapes can help design and install something spectacular.
Contact us for a consultation on professional fountain design throughout Kansas City and Northwest Arkansas.
Related Services
Ready to Start Your Project?
Contact Freedom Stone + Pondscapes for a free consultation on your water feature, hardscaping, or outdoor living project in Kansas City or Northwest Arkansas.
Related Articles
Water Features
Pond Builders in Northwest Arkansas: Complete Guide for Homeowners
Everything you need to know about building a custom pond in Arkansas—from Ozark climate considerations and native stone options to costs, permits, and finding the right pond builder in NWA.
Water Features
Backyard Waterfall Installation | Kansas City | Freedom Pondscapes
Learn what goes into a professional backyard waterfall installation in Kansas City and how to bring the sound of water to your outdoor space.